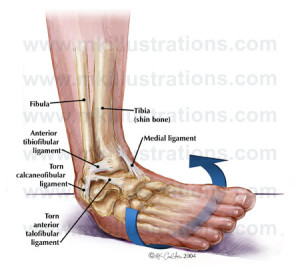
An ankle sprain can happen so easily: jumping up for a rebound and coming down on another player’s foot, stepping in a hole that you didn’t see in the thick grass of a big field, twisting an ankle when stepping off a platform in the gym or an aerobics class. Collegiate and professional athletes have athletic trainers to help them when they get hurt. But what do recreational athletes and regular Joes do when they sprain an ankle? I’ve had nine of them, five on the right ankle and four on the left. I learned what to do the hard way.
If you’re capable of jumping around on the good leg, do that. Don’t waste any time – pull out a big cooking pot, fill it with water that will rise three inches above your ankle bones, throw in a tray of ice cubes from the freezer, and push your foot down to the bottom. Holler if you have to, I always do. Somehow screaming “Aghhhhhhhhh!” makes it possible for me to get my foot into the icy water. Don’t get me wrong – it’s going to HURT when that ice hits your skin. But know that in about two minutes the icy hurt will start to fade. Next comes a deeper ache as it starts to freeze the tissues and stop the swelling. There’s a point around five minutes into the icing where you will think it’s all just fine. You’re numb; you can’t feel the damage that the sprain caused. Set a timer for ten minutes the first time. That’s about all you’ll be able to take. After the numbness will come another wave of deep ache. Do your best to keep the foot in the ice water for the full ten minutes if you can. If not, stop at six or eight minutes. When you take your foot out of the ice water it will be red, so don’t be alarmed. That’s part of the process. Immediately wrap your foot and ankle with a thick towel and THAT is when you’re going to love this treatment! The best part of icing is when you stop and the delicious “thawing” sensation flows in. Let the normal color come back to your foot, then repeat the whole process. That’s right, do it twice. Continue doing this twice a day, morning and night, for at least the first month after any ankle sprain.
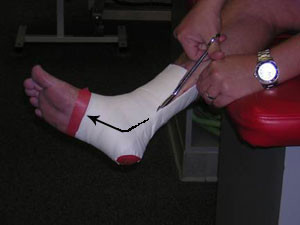
The ice closes down the blood vessels to stop swelling, then you let blood in again to keep the tissues healthy, then you freeze it one more time. The second time around, you’ll be an old pro so know what to expect. Here’s where you can start planning the next part, the taping and the support your ankle will need to get you through the days and weeks of its recovery. If you’re a former jock like me, you might have some white athletic tape in your closet. If not, get someone to pick up some 1 ½” Johnson & Johnson white athletic tape from the nearest drug store. Other things that are nice to have are a spray to make the skin sticky to hold onto the tape, an underwrap to prevent the skin from tearing when it is removed, and some tape cutting scissors. (Shave the hair from the mid-calf down before applying the tape.) After my second ankle sprain, I learned how to do my own taping and so can you. It makes you independent as you recover, not having to go somewhere or to someone just to be able to feel as though you can walk.
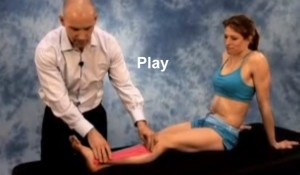
The link below is the best video I found on taping an ankle with the basket weave method. It totally immobilizes the foot and ankle. You can walk on it, although stiffly, and it feels incredibly better as soon as the tape is on; it feels as though it immediately takes away at least 50% of the problem. If you would rather have a professional tape your ankle for you, find a local athletic trainer or physical therapist to help.
The trainer in the video is exceptionally good at taping. My tape jobs aren’t as smooth or beautiful as his, but they work. They protect my ankle so I can do no-impact workouts in water. I could get in the pool the very next day after an ankle sprain and do the exercise program below.
The tape comes off at night when you go to bed. Get a few pillows to create the configuration around your foot that will make you most comfortable. I always put a big pillow right next to the foot to keep the weight of the sheets and blankets off the foot. I always put a smaller pillow under the lower calf so the foot doesn’t feel pressure below from the bed. These positions change depending on the position in which you sleep. If you sleep on your side, keep the injured side on top and put a pillow beneath it on the inside of the ankle or between your ankles.
When you wake up and realize you can’t do your normal workout that day, plan to switch your training program to the pool. You don’t have to get out of shape because of an ankle sprain. Find a pool that has water deep enough that your feet won’t touch the bottom. Next, strap on the flotation belt that will hold you upright for some deep-water exercise. Even if you’re a good swimmer, you’ll want to wear a belt so that you can concentrate on good form, not make extraneous stay-afloat movements. If you can stand a little discomfort, you can get started right away, because it may hurt the first few days you get in the pool due to the pressure of the water moving around the ankle. But each day gets better and you’ll have less pain.
Don’t even think about getting in the pool to do the program below unless your ankle is taped! The water creates resistance to any movement you make, and your foot would be pushed around by the water’s resistance causing pain and potential re-injury. The tape is like putting a removable cast on your foot long enough to work out. Then the wet tape comes off after the pool workout and you re-tape the ankle or get it re-taped by a professional.
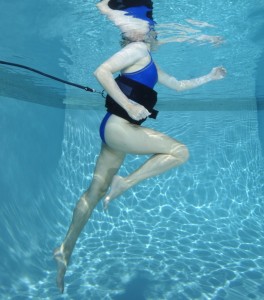
1. Deep Water Run
Begin running in an upright position as shown below. Use the exact motion of good running form on land. Your head and chest are erect; shoulder are relaxed and down. Eyes focus straight forward to keep the head level and unmoving. Pull one elbow back and then the other as you lift the opposite knee.
2. Power Walk
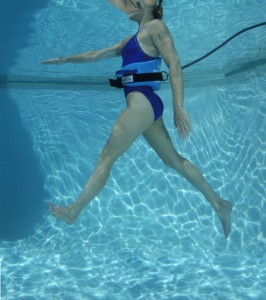
Establish an “opposition position” by reaching your left arm and right leg forward at the same time as shown below. Keep both arms and both legs completely straight as you begin swinging them forward and backward. After the first few days or week, you should be able to start flexing and pointing your feet without too much pain in the ankle. As soon as you can, you want to start the flexing and pointing your feet to regain mobility in the ankle. As the right leg moves forward as in the photo below, lift the toes up and as the left leg move backward, point the foot back as seen.
3. Flies
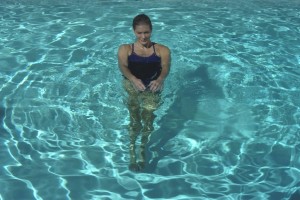
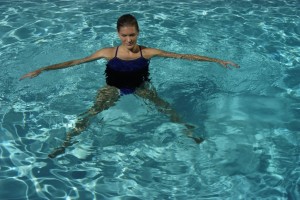
Start with your arms and leg together as shown below (top). Open your arms and legs wide as shown below (bottom). Keep your hands flat, slicing sideways just below the surface of the water. As soon as you can flex and point your feet for Power Walk, add the flex and point with this exercise, too.
4. Interval Training
Now mix up these three exercises going faster and slower on the running and walking exercises to get your heart rate up. Use the Flies for a recovery period between higher-intensity periods. See The Complete Waterpower Workout Book for many examples of a good interval training program.
After the aerobic and anaerobic training of deep-water intervals, you can stretch and do other exercises as shown in “Lynda Huey’s Waterpower Workout” DVD. Finish up with the specific ankle rehab exercises #5-8 below.
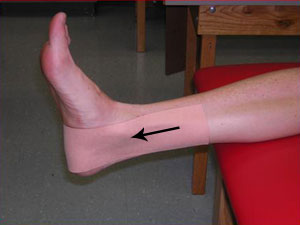
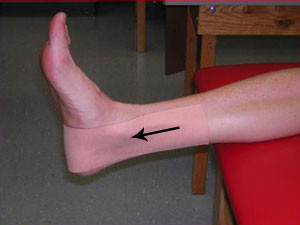
Once you’re past the first week and if you’re healing well, you can switch to Elastikon tape. I like it because it’s stretchy and allows me to move the ankle more easily through its range of motion while doing these exercises. The photo below shoes just the first strip of tape being put on. Notice that you pull the stretching tape down on the inside and upward on the outside, which keeps your foot from moving inward the way it was sprained.
5. Toes Up, Toes Down
Hold onto the side of the pool as you stand on your good foot or sit on a step. Working the recovering ankle, gently lift your toes and foot up then push them down, working to regain strength and range of motion in your ankle and foot. As you heal, you can increase reps and speed. You can also do this while your foot is in the ice water every morning and night.
6. Foot Circles
Circle your foot clockwise, then counterclockwise. As you heal increase reps and speed as well as the size of the circle. Do this one in the ice water, too.
7. Alphabet with Big Toe
Using your big toe as the focal point, write a capital A, then B, then C, etc. Start slowly. The edges of some of the letters will hurt the first few times you move your foot into that position. This will take concentration and be harder than you first think, so start with A-G, then the next time write A-L, then A-R, and finally the whole alphabet. Besides doing this in the pool, you can do it again in the ice water each time.
8. Walk on Toes; Walk on Heels
Make sure you’re walking without a limp before trying to walk on your toes. Walk across the pool in chest-deep water. Then try walking on your heels. If either causes you pain, wait and try again next week.
Kinesiotape is very much in vogue these days, and after you’ve gotten past the stage where you really need support just to walk on the foot, you can have a physical therapist or trainer apply such tape to your ankle. But this tape job is very easy to do, and after watching the video below, I suspect you can do it for yourself. Kinesiotape exceptionally good at removing swelling from any area of the body, but your ankle needs some swelling at first to protect it from further movement and damage, so my suggestion is that you use the white athletic tape followed by the Elastikon tape until you’re walking reasonably well. Use the ice to cut down swelling in the initial acute injury stage. Then Kinesiotape can pull out the last of the swelling for you.
As walking and weightbearing become easier over the next weeks, consider keeping your float belt on and starting running in chest-deep water. If the pool is slanted, face the deep end, which means you’re running slightly downhill, taking pressure off the foot and ankle. After the running can come various plyometric jumping exercises, all of which are in the DVD linked above. Your ankle may get sore as you begin to challenge it. This would be a good time to try an ice masssage directly on the areas of the ankle that need help. Sometimes it’s the ligaments on the side of the ankle that remain sore. Most of the time with my ankle sprains, the ligaments on the top of the ankle where the shin bone meets the foot were the last to lose their soreness. Those are ideal spots to do a specific ice massage. Put a few dixie cups filled with water in the freezer. After they are frozen, take one out and peel about an inch of the paper cup off. Now you have the rest of the dixie cup as a handle for a nice chunk of ice that you run in circular fashion around the sore areas. Continue with this ice massage until the skin is red and the area feels numb. This technique can be a miracle cure. Do it whenever you’re sick of having ankle pain.
Questions about your own sprained ankle? Lynda is happy to answer the questions of any of her followers on Twitter.com/lyndahuey.
Lynda Huey, M.S., founder of CompletePT and Huey’s Athletic Network, is a former athlete and coach whose own injuries led her into the water to find fitness and healing. She was educated at San Jose State University where she starred on the track and field team during its golden years. Lynda is the author of four books on water exercise and water rehabilitation.

